Jacob Mittlider is an American agronomist and inventor of new methods of growing garden crops. The greenhouse constructed according to his method attracts the attention of many summer residents. In this article, the construction of such a greenhouse is examined in detail, and instructions for its construction are also given.
Mittlider Greenhouse Features
The Mittlider greenhouse, according to many who dare to test it in their plots, despite the size and cost, is more effective than an ordinary greenhouse.
The main design feature is in its configuration, especially for the roof:
- The shape of the structure is rectangular, elongated from west to east. In this case, the roof slope, located below, faces south. The higher part of the roof, not equipped with vents, takes over the northern winds.
- Both roof slopes are not connected by a ridge, as is customary in ordinary greenhouses. Their bases are mounted on two independent bars located at different levels. At the same time, a segment of a higher slope located above the southern part of the roof contains holes for ventilation.
- The invention of the American is quite high, taller than human growth, which allows you to safely care for crops. Also, due to the large area of the side surfaces, more heat and light penetrate into the room.
- The stability of the structure is ensured by numerous support beams, which are located at small intervals.
Did you know? In Iceland, despite the harsh climate, even exotic crops are successfully grown - all thanks to the unusual greenhouses. Icelandic greenhouses are built on lands with hot underground springs, whose energy provides plants with warmth all year round.
Benefits
- Among the advantages of the "American", as the greenhouse is also called, the following are noted:
- Simple and efficient air exchange - a cool, fresh air stream enters through doors and windows, and spent hot air is carried through the upper transoms.
- A large number of supports and support beams gives the structure stability and strength.
- Assembled and fastened using easily removable fasteners, the greenhouse is collapsible, which allows it to be transported.
- The ventilation holes are always on the south side, which increases the influx of heat and light, eliminates the penetration of northerly winds.
- Thanks to the two-level roof, condensation does not collect under the ceiling, as in ordinary greenhouses. Therefore, an optimum level of humidity is maintained here.
- Height is convenient for growing tall crops.
- A large area of the room allows you to create the most acceptable microclimate. Maintenance of a spacious room is much more convenient.
Disadvantages
Opponents of the greenhouse by the Mittlider method argue that there are other ways to achieve improved air exchange, without building an asymmetric roof.
- Among the shortcomings are noted such factors:
- Due to the height of the structure, the consumption of materials and, consequently, the construction budget are increased.
- It is not possible to use automation to open the window. Automatically provides only vertical lifting transoms, and requires horizontal. Opening the transom manually is difficult, given the height of the building.
- In case of precipitation, one of the sides is loaded with snow more, which can overwhelm the entire structure.
Did you know? The creator of the first winter garden, Albert Mangus, was accused of witchcraft in 1240, since it was believed that without magic it was impossible to make plants bloom in winter.
Varieties of Mittlider cultivations
"American" is built on several types of structures:
- The construction of a rectangular type with a sloping roof, consisting of two planes located at different levels.
- The building has an arch-shaped roof, where the roof is also divided into two levels.
- With two transoms - the same classic arch shape, with only two vents for window leaves (one in the center of the south side). This type of construction is relevant in hot climates, where additional ventilation is required.
How to independently build a Mittlider greenhouse
Before embarking on the construction, it is worth deciding on the dimensions and materials, as well as preparing the site.

Seat selection
The site for the "American" should be flat, it is desirable to level the slopes.
The effectiveness of the greenhouse will depend on the correct orientation to the cardinal points:
- the entrance and exit of the room looks east and west;
- the side with a high continuous slope is oriented to the north;
- the side with vents and with a low slope faces south.
Foundation pouring
Under the lightweight, collapsible design, it is easier to make a point foundation. First you need to clear the site, remove it and make markings with the help of a string stretched on the stakes.
Further scheme:Important! Sunlight illuminating the greenhouse should not be blocked by buildings or tall trees.
- At the corners of the building, screw metal screw piles into the ground, the pitch between the stakes is 1 m.
- Next, build a base from the beam on which the greenhouse frame will be installed.
- The upper part of the foundation must completely match the level of the ground.
- To process a wooden part with special means for protection against moisture and insects.
The best foundation in the design of a heavy greenhouse with a polycarbonate coating and a metal frame is considered to be tape filler.
Strip foundation technology:
- The first stage of construction is marking. In the corners you need to drive in the stakes and pull the rope.
- Dig a shallow, up to 0.5 m, trench under the base. The width of the recess is approximately equal to the width of the shovel bayonet. Level the walls, tamp the bottom and fill with a mixture of sand and gravel with a layer of 10 cm.
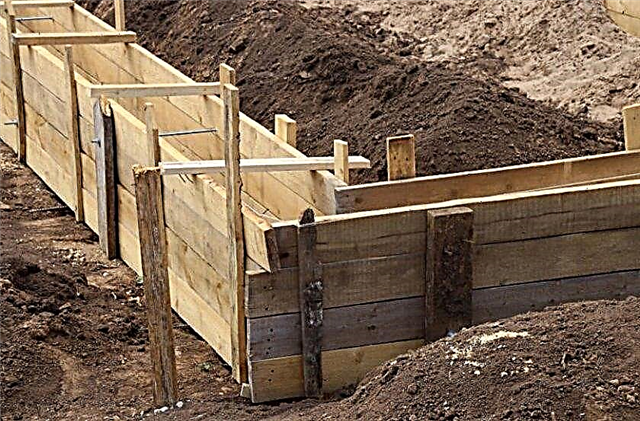
- Install wooden formwork above the ditches with a sand cushion (Fig. Below). You can use any old boards for formwork.
- Fill the furrows with concrete. You can buy a factory mixture or make yourself from cement, gravel and sand. The proportions are 1: 4: 3, plus for each 1 kg of cement, approximately 0.6 l of water.
- After a week, the formwork can be removed. When the framework can be installed, the foundation will gain the greatest strength in 20–25 days.
Carcass construction
The easiest material to work with is a wooden beam. It is easy to find in construction stores.
For work you will need the following materials and tools:
- the basis of the frame is a beam with a section of 100 × 100 mm;
- doors, roofing and other - timber 50 × 75 mm;
- screws and corners;
- T-shaped connecting plates;
- canopies and loops;
- level, tape measure, pencil;
- screwdriver;
- jigsaw;
- wood and brush products.
Drawing example:

Assembly technology of a wooden greenhouse:
- For the base with a saw or a jigsaw, cut the bars 100 × 100 of the desired length.
- Assemble the box in the shape of the perimeter, corresponding to the dimensions in the drawing, using self-tapping screws and plates. It is more convenient to assemble directly on the foundation, checking the level of the absence of errors.
- Assemble the sides (timber 50 × 75). Fasten the horizontal and vertical racks of the required length to fasten with screws. The distance between the vertical supports is 1 m. Assemble in such a way that the wide side of the cross section looks at adjacent racks.
- On the south side, make additional horizontal bars for future windows. For structural strength, the supporting elements are additionally strengthened with slopes.
- For the frame of the end walls, cut the racks from the beam 100 × 100, attach to the side walls. To the vertical base add horizontal lintels from the timber of a smaller section. Make the second end face taking into account the door frame.
- The manufacture of a roof requires special care and verification with the drawing. Attach the roof pillars with the same pitch to the long side walls.
- To the main supporting beams (Mauerlat) from a 100 × 100 timber, attach horizontal posts forming slopes. The distance between them is calculated based on the angle of the roof.
- Between the northern and southern slopes of a thin beam to make a flat edge, which serves as a frame for window leaves.
- The rafters connecting the edges of the greenhouse and the surfaces of the slopes should be strengthened with a support beam (see the figure below).
- The final stage is the manufacture of doors, window leaves and fixing them on the openings using metal hinges.
Important! Before you get started, all wooden parts of the frame should be protected from moisture and bark beetle by applying an antiseptic.
The metal frame for the "American" is rarely used, since metal, unlike wood, is prone to condensation. If such a base is still preferable, then for the construction they use profile pipes or a metal profile of different sections, taking into account the load from wind and snow.
So, the materials that will be needed:
- bottom harness - profile pipe 50 × 50 mm;
- vertical racks - profile 40 × 40 mm;
- braces - profile 40 × 20 mm;
- roof beams - profile 40 × 20 mm;
- corner supports - profile 20 × 20 mm.
Details can either be cut independently or ordered in a specialized company. Before starting welding, all parts must be thoroughly cleaned and treated with anti-corrosion compounds.
All structural elements must be welded separately:
- side walls, depending on their length, it is more convenient to break into several sections;
- 2 pediments, in one of which it is necessary to leave an opening for the door;
- the roof consists of 4 parts: 2 slopes and 2 ends;
- door frame, windows and transoms for roofing.
The assembly sequence is as follows:
- On the finished foundation, first weld the roof elements. Firstly, it is convenient to work on a flat surface, and secondly, accuracy is immediately controlled. The ends with respect to the surface of the foundation should be located at right angles.
- Weld slopes with ends using braces, then strengthen the roof frame with side slats.
- It is recommended to outline the finished roof with chalk not in full, but in the corners, which will help to build the corners of future walls. Then push the roof aside.
- Put down the details of the greenhouse box according to the order, taking into account the left angle marks. First, weld the base of the walls, and after assembly, strengthen with crossbars and struts.
- Then it’s up to the small thing - insert the air vents and the door, install the roof and fix it.
Important! Until the roof is installed, it is advisable to sheathe it right away - it will be more difficult to do it later.
Roof drawing example:

Arched frame:

Polycarbonate lining
Greenhouses are sheathed either with a transparent film or with polycarbonate. The film is mainly used on wooden structures. This material must be attached using a construction stapler or thin rails and nails. For better thermal insulation, lay 2 layers of film with a distance of 5 cm.
Polycarbonate sheathed greenhouse on a metal frame.
We recommend reading about polycarbonate greenhouses and their arrangement with your own hands:
Sheathing Rules:
- Drill holes for self-tapping screws with a diameter of about 2-3 mm.
- Unpacked sheets, having removed the protective film, cut. Glue the edges of the sheets with a perforated tape (top) and a sealing tape (bottom).
- The sheets are applied in the sheathed part with a stabilizing coating to the outside, fixed with screws. No need to tighten the screws, otherwise the material will burst.
The video below shows the process of assembling and cladding an arched greenhouse:
Video: installation of the Mitlider greenhouse
Air circulation and thermoregulation system
For the Mittlider greenhouse, an additional air exchange and heating system is not required. The location of the ventilation vents along the entire length is a guarantee of uniform air exchange over the entire area. The transoms located on the south side protect the plants from hypothermia.
All builders need to consider to meet these conditions:
- the northern slope is higher than the southern, with a slope of 45 °;
- roof slope, the basis for ventilation frames, made at an angle of 30 °.
In addition, you must take into account the size of the room and the ratio of the number of ventilation transoms. If the room has dimensions of approximately 3 × 10 m, doors can be made on both sides. If you plan a large room for tall crops, such as tomatoes and cucumbers, then additional windows will be needed.
Useful tips to gardeners
Successful cultivation of crops in the "American" depends on compliance with all the rules of its construction, so it is important to draw a drawing and constantly check it.
A few tips:
- No shadow should cover the greenhouse. In extreme cases, it is necessary to erect it in a place where it will be lit from 12 noon to sunset.
- It is undesirable to build a structure in the lowlands - here the air temperature is usually several degrees lower than on flat or elevated areas.
- It is also important to observe the rules for the location and arrangement of beds. They should be narrow and strictly horizontal, the distance between the beds - up to 1 m. On the edges, it is necessary to erect the sides that prevent moisture from going into the aisles, providing only the root system of plants.
- The beds need to be filled with artificial substrates, which allows you to grow high-quality crops on poor soils.
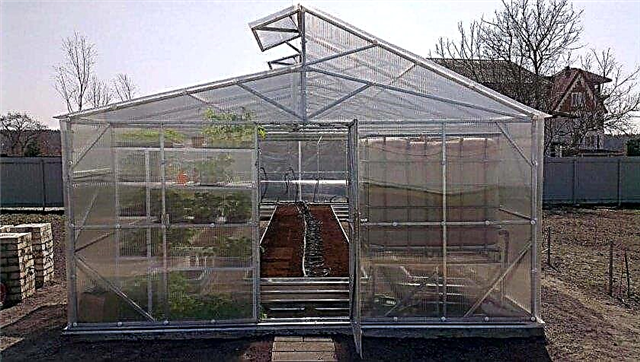
The Jacob Mittlider greenhouse method is used by many experienced vegetable growers and large farmers. Such hotbeds have proven themselves in the year-round cultivation of various crops.


